
There are various kinds of insulation used in UK homes. Going back to the ’60’s, a compressible ‘chip’ of Micafil was common. This is a naturally occurring material that’s heated until it expands, springing apart into a layered silvery-white granule that’s about the size of pea shingle. As a loose fill material, it was easy to simply pour it between the joists and a couple of inches of it met the insulation standards of the day.
Mineral wool overtook this as the ‘go to’ insulation: it looks like a blanket made of long, light brown fibres and is usually sold in compressed rolls, making it easy to transport and physically get into the loft. In some cases, this wool is bagged which hugely cuts down on the loose fibres that could otherwise be inhaled when handling this material and it becomes more like laying lots of sleeping bags in a line: easy and convenient.
About a quarter of a home’s heat is lost through an un-insulated roof. While this will be significantly reduced by having some insulation, it’s definitely worth checking if we can upgrade what’s already fitted unless we know our home already meets – or exceeds – the current specifications.
As a project, adding insulation to the loft is almost always going to be a winner: heat rises and reducing the amount we lose through the ceiling has to be a good thing; it’s not a technically difficult job (it needs no specialist tools); it’s a fairly cheap upgrade; it lasts for years – and if it’s not the neatest job in the world, it still works! It’s an ideal first-timer’s project.
How deep should the loft insulation be?
New homes (2022 standard) have to have 270mm of insulation in the loft. This regulation has changed over the years: back in 1965, the recommended depth was just 25mm! There’s nothing to stop someone from going beyond this recommended depth though – but the law of diminishing returns plays a part and there comes a point where the money would be better spent in other energy efficiencies.
Is it worth adding more insulation on top of what the home already has?
For the typical home, this is the annual saving vs. upgrading to 270mm of insulation looks like this:
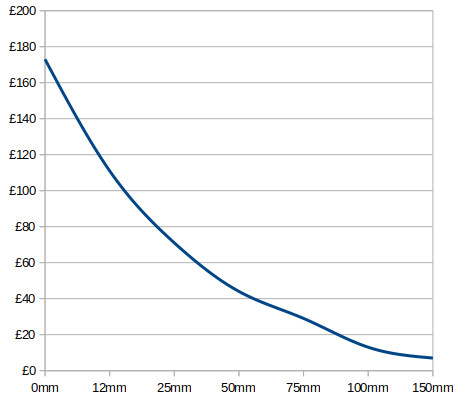
In short, a ’60’s home that has the then-standard 25mm of insulation will save about £70 per year in energy costs compared to having 270mm of insulation. Given their upgrade would be about £300 in materials, this means it’ll only take about 4.5 years to start to pay for itself. On the other hand, a home with 100mm of insulation today will only be losing about £18 per year compared to the losses 270mm of insulation would offer and so the payback period is significantly longer. Your cost will vary based on the size of your home but the ratios will be broadly the same. Note these figures and the graph data was formulated using energy price data from before the 2022 increases – if anything, the savings are even more pronounced now.
Is installing loft insulation difficult?
Using the bagged fleece, it’s easy but there are some things to watch for. Joists – the beams you walk on in an un-boarded loft – are at best 100mm deep. Having a total of 270mm of insulation will come up much higher than the joists, meaning it’s impossible to see where you’re walking! Also, if the loft is used as a storage area then squashing the insulation down by placing boards directly on the joists will waste all that extra work (insulation works by trapping air between the layers or fibres). If boarding is planned then joist risers will be required. These are nothing more than a ‘leg’ that either clips over or is screwed down into the joist and has a platform at the top that the new boarding is then secured to. Of course, this ‘lifts’ the floor by the height of the leg and this needs to be accounted for: if your loft already has very restricted height then this could be an impractical solution.
When it comes time to lay the insulation, the best advice is to start by filling the gaps between the joists. If you are topping-up the existing insulation or adding the second layer, unroll the blankets at 90o to the joists to help fill the air gaps alongside the joists.
Header tanks in the loft
One thing to bear in mind: by insulating the loft’s floor, anything in the loft itself will naturally not get so much heat – and that could have an impact on a header tank or cold water storage tank up there: in a cold winter, this could lead to the freezing of pipes or even ice forming in the header tank or valve. To prevent this, make sure all the pipes above the insulation you add have their own insulation – the ‘pool noodle’ tube foam is easy to fit and looks tidy – and do not push the insulation layer under the tank but treat it like a bit of raised floor: run up the sides and (ideally) over the top with the insulation, loosely taping it in place. This will allow some heat from the room below to keep the tank’s contents slightly warmer and help prevent issues.
Personal protection while working
Working in a loft – especially one that is not boarded – has risks. Lighting is usually dubious at best, safe places to stand are at a premium and you may well be throwing up dust from the existing insulation, along with particles from the new. Ideally, have multiple sources of light to help prevent shadows from creating ‘false joists’ and use portable boards to stand on rather than trying to balance on two bare joists! Wear suitable breathing protection, gloves and eye-wear (the insulation you’re laying should have suitable guidance on the packing) and, if you’re disturbing existing insulation, take stock of what’s there and what hazards that will present.
Contrary to what some might think, spiders don’t generally hang around in lofts: there’s usually not that many things for them to prey on up there so there’s really no value for them to be there – but if the thought of bumping into one sends shivers down your spine, perhaps this is a job you can outsource!