The immersion heater is the electrically-powered element in a hot water tank. In gas-heated water systems, it’s there to offer a ‘boost’ at times when the boiler alone can’t bring the water back to a suitable temperature. In these homes, the immersion will be on a manual switch (we’ve written a piece on changing this to a timer or at least adding a light so you know the heater’s on). In these cases, the immersion is usually fitted up near the top of the tank and will only heat the upper volume of water – electricity being about twice the price of gas per KWh).
In other homes – ones using Economy-7 electricity for example – the immersion heater is THE source of water heating and, in these homes, there could be two immersion heaters; the main one that only works on the cheap tariff at the bottom and the ’emergency’ or top-up heater higher up the tank.
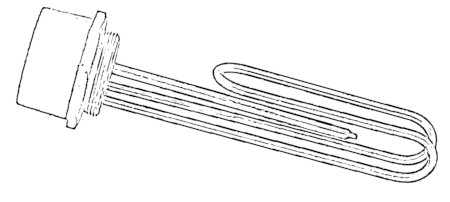
If an element fails, it’ll need to be replaced.
Warning: mains electricity
First and foremost: we’re dealing with things connected to the mains electricity supply. Be ABSOLUTELY SURE you’ve isolated the circuit before proceeding. In many cases, the immersion will be wired and fused separately from the central heating system & just turning the home heating off won’t affect power to the immersion. If in doubt, call in a plumber or electrician.
How to change the element
Once you’re sure the power is off we can have a go at this!
Shut off the cold water feed to the tank – this is probably controlled by a valve in the supply pipe feeding the hot water tank itself (cold inlets are at the bottom of the tank) or by stopping flow from the header tank above (in the loft probably).
Next, we need to remove the remaining pressure in the system by opening a hot tap. Don’t drain it all though, just enough to reduce the pressure. Why? Because we need a full tank of water to help with the next bit…
Now we need to loosen the old fitting. This will be amazingly tight (the scale build-up and constant heating/cooling will seize the two parts together) and needs a spanner that’s bought especially for this one job (it’s about a 6cm nut). You might have to encourage it with a few taps from a hammer but go easy! This is why we’re using a full tank: the water will prevent the tank from distorting as you bash the hell out of the fitting! An old engineer’s trick for a nut that won’t budge is to give it a few taps in the wrong direction – tightening it – this sometimes breaks the seal between two stuck parts. Either way, just slacken it enough to know you can remove it but do NOT undo it yet – the water level in the tank now needs to be drained down to below the level of the immersion heater fitting.
Once the water level is lowered, the old element can be eased out of the tank and the threads of the hole cleaned of any remaining scale and debris.
Use PTFE tape around the new immersion heater threads, make sure the washer sits correctly and wind the new unit in place by hand (why by hand? Because the fitting is wide and shallow – and wide, shallow screw threads are oh-so easy to mis-align and do irreparable damage to the fitting. Mess this up badly and you might be looking at a new hot water tank)
Tighten the fitting up with the same ring spanner used earlier. There’s no need to go crazy with the torque, hand tight and then about 1/8th of a turn is probably sufficient.
Close any open taps and bring enough water back into the tank to cover the element so you can watch for leaks. Add more water in line with your confidence until the tank is full again.
Leave it 30 minutes or so and check for leaks again – a minor weep can take a while to show up.
Set the temp. to 55-60oC and restore power.
Test the new immersion.